Wifi is now an inseparable part of our lives. Recently, I was taking a DHCP class in a networking class and suddenly I was using wifi every day, and I was curious about how it works and how to connect to it. In this article, I will try to summarize the basics of Wi-Fi and DHCP.
Wi-Fi
In a nutshell, an access point converts wired internet signals into wireless signals and scatters them around, and devices such as smartphones and laptops receive them to access the internet. Unlike a wired LAN (local area network), there are no physical cables to send and receive data through radio waves in the air.
In other words, it’s essentially the same as a regular wired internet connection in terms of how you access the internet and use services like surfing the web or watching videos. Wi-Fi simply replaces the last leg of the internet connection with radio waves instead of physical wires.
However, the “wireless” difference makes some important differences, both technically and in the real world. For example, reliability and speed. Wired connections are very reliable and fast because data travels over a physical cable. Wi-Fi, on the other hand, uses radio waves and is highly dependent on the surrounding environment. However, it’s very mobile. In fact, this is probably its biggest raison d’être and advantage: while wired internet can only be used in a fixed location, Wi-Fi gives you the convenience of being able to move around and use the internet as long as you have signal coverage.
Except in peer-to-peer settings like hotspots, Wi-Fi works primarily on a client-server model. Generally speaking, based on the Wi-Fi environment we use, the roles are divided as follows
- Server: Your router acts as a server. It allows and manages access to the network for each device and relays data.
- Clients: All devices that connect to the router to request and receive internet service, such as smartphones, laptops, smart TVs, etc.
Similar to the traditional client-server model, the client requests the server to connect to the Internet, and the server receives the request and connects to the Internet. DHCP is used to assign a network address (IP) so that the server can actually use the Internet in response to the client’s request.
Relationship between Wi-Fi and DHCP
We mentioned that DHCP is used to assign IP addresses. The first thing we do when we connect to Wi-Fi in a cafe is to enter a password, but what does this have to do with DHCP?
The answer is that the password authentication process happens before DHCP. Before the client requests an IP address from the DHCP server, it verifies that it is authorized to access the network. The overall flow looks like this
- Scan: Your smartphone searches for available Wi-Fi signals around you. This is the familiar list we see on the Wi-Fi settings screen.
- Authentication: The user selects a specific Wi-Fi (SSID) and enters a password. The router verifies that the password is correct and that the person is authorized to access the network. This is the process we often think of as “connecting to Wi-Fi.” 3.
- Association: If the authentication is successful, the router will add the device to its managed list.
Only after the association phase is successful is the smartphone ready to send a DHCP Discover message to the network to get an IP address.
SSID stands for Service Set Identifier, which is the name of your wireless network (Wi-Fi network). It is a unique name that a router or access point (AP) assigns to identify the network it provides. For example, the name of the network that appears in the list of nearby Wi-Fi on your phone or laptop is the SSID. SSIDs serve as identifiers to distinguish between networks and prevent confusion when there are multiple networks in the same area.
DHCP
Short for Dynamic Host Configuration Protocol. It is a protocol that automatically (dynamically) assigns and manages information required for communication, including IP addresses, to devices connecting to a network.
Imagine a cafe with Wi-Fi, where dozens or hundreds of customers access the Wi-Fi every day with a variety of devices. If you think about it for a moment, you can imagine the following problems that could arise without DHCP
- Problems with manual IP settings: What if each customer has to enter their own IP address? You don’t know which IPs are free, and duplicate IPs can cause conflicts.
- Management complexity: If a cafe owner has to manage and record the IPs of all devices, it’s not practical.
DHCP solves these problems. When a device joins the network, it automatically finds and assigns an available IP address, and when it’s finished using it, it can be reclaimed and reassigned to another device.
DHCP in action (DORA)
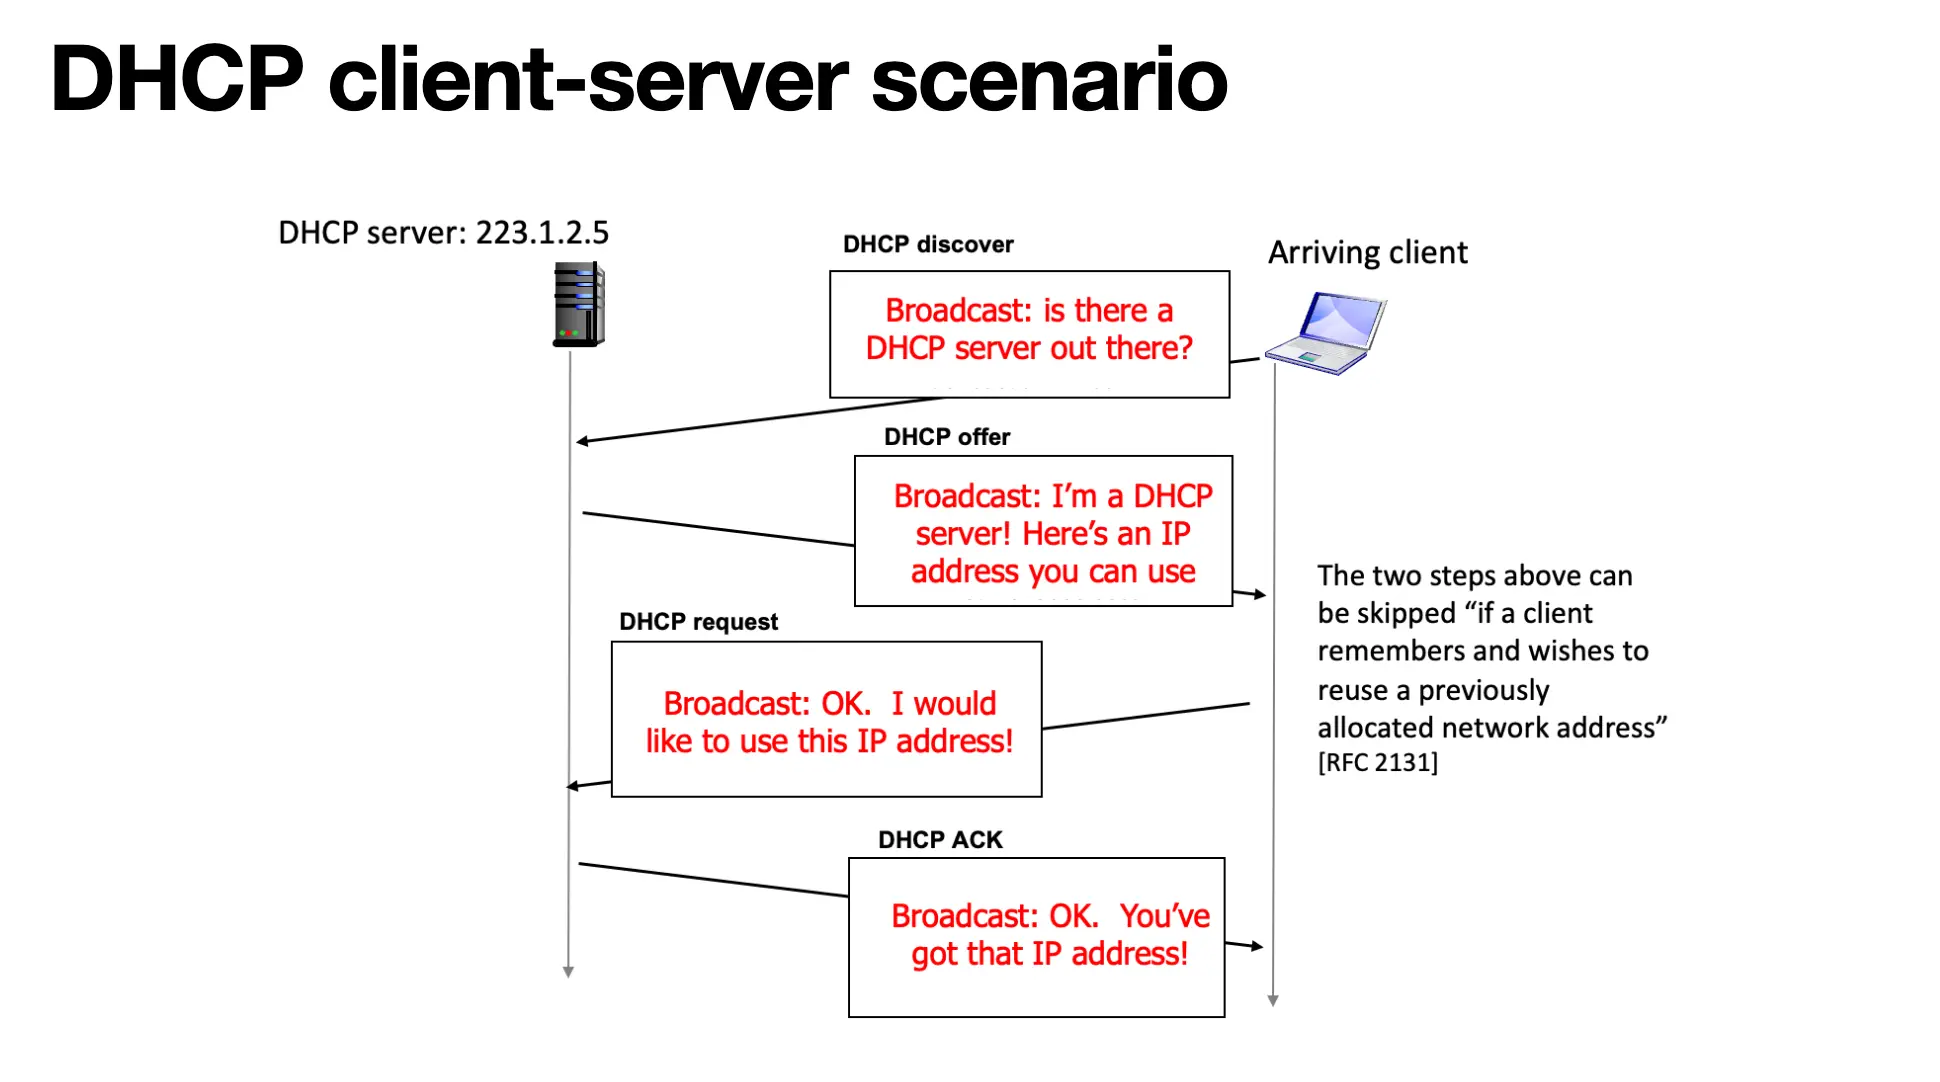
Let’s take a look at the four steps of DHCP that actually happen when you connect to Wi-Fi. This process is sometimes referred to as DORA, which is an acronym for each step to make it easier to remember.
Actual data transfer
**1. D - Discover
- When the client connects to the network, it sends a broadcast message asking “Is there a DHCP server?”
- At this point, the client does not yet have an IP address, so we send it as a broadcast (255.255.255.255)
**2. O - Offer (Offer)
- DHCP server (223.1.2.5) replies “I’m a DHCP server! Here are some IP addresses available”
- The server offers network setup information, including available IP addresses.
**3. R - Request
- Client says “Okay. I’d like to use this IP address!” and the server responds by broadcasting it
- If there are multiple DHCP servers, the client is notified that a specific server’s proposal has been selected
**4. A - ACK (Acknowledge)
- DHCP server confirms, “Okay, now use that IP address!”
- At this point, the client will be able to use the assigned IP address and network settings
This is the typical DHCP connection process. But there are a few questions you may have.
- DHCP is used to assign IPs to nodes (to connect to the Internet). But how can a client connect to the network and send broadcast messages?
- Why is a request process necessary when a connection can be established by 1. discovering, 2. making an offer, and then the server 3. ACKing (just like the 3-way handshake in TCP)?
- Is there an expiration date for IP addresses? What happens if I leave the cafe and come back tomorrow?
I had these questions, so I looked it up.
1. How can I connect to the network and broadcast if I don’t have an IP?
I thought that a network connection meant a connection at the Network Layer or higher, which is the third of the seven OSI layers that allows Internet communication by receiving an IP address. However, DHCP Discover messages are only possible with a Data Link Layer connection, which is the second layer.
The point of DHCP is for a client without an IP address to find a DHCP server on the network that it doesn’t recognize. To do this, it needs to broadcast messages throughout the network that it knows about. TCP is not well suited for DHCP because it is oriented toward 1:1 connections and does not have broadcast capabilities.
*TCP can’t even be used by nodes that don’t know their IP in the first place.
To summarize, DHCP’s broadcasting is possible because it occurs at the second layer of communication, rather than at the third layer (network layer), where IP addresses are required.
2. Why Request is required in the order of Discover -> Offer -> ACK
The main reason why the Request phase is necessary in DHCP is because there can be more than one DHCP server on the network.
As you can see above, a client sends out a broadcast message on the network it belongs to. All DHCP servers on the network receive this message. If there is only one server, this could be done in the order Discover -> Offer -> ACK (as is the case with TCP). If there is more than one server, the client will receive multiple Offer messages with different IP addresses. The client has to choose one of these offers, which it does by broadcasting the Request message back to the network, e.g., “I’m going to use the 192.168.0 IP address offered by server A”. The reason for this broadcast is for other servers that were not selected. The unselected servers realize that the client did not select their offer, and they reclaim the IP address they offered so that they can assign it to another client. This is more efficient because it frees up space for other clients.
Without the Request phase, a client would have no way to tell other servers which server’s offer it accepted, nor would it be able to communicate which DHCP server to choose. The Request phase is essential to efficiently manage IP addresses by selecting one of several DHCP servers and notifying other unselected servers.
3. IP address expiration date
IP addresses are a finite resource, and if a device leaves the network and continues to occupy an IP, the resource is depleted. In high-traffic areas such as cafes, devices are constantly changing, so it is important to reclaim unused IPs and reassign them to new devices.
When a DHCP server assigns an IP address, it gives it a lease term: “This IP is valid for N hours”. The client can only use that IP for this period of time, and must request a renewal from the server before it expires.
What if I leave and return to the DHCP server after being assigned an IP?
In this case, the behavior depends on whether the IP lease has expired or not.
-
If the lease hasn’t expired (e.g., you left and came back for a while).
- The client (my smartphone) remembers the IP address it was previously assigned.
- When it rejoins the network, it sends a direct
Requestmessage to the DHCP server saying “Can I continue using the IP address I was using last time?” without going through the whole DORA process. - If the server says yes, you get a ACK, and you’re assigned an IP and connected faster.
-
**When the lease expires (for example, if you come back the next day)
- The IP address that my smartphone had has expired, so the IP may have been reclaimed by the DHCP server and is being used by someone else.
- Since my smartphone does not have a valid IP, it will go through the entire DORA 4-step process again, starting with Discover, just like the first time it connected.
- You may get your old IP back, but in most cases, you will be assigned a new IP address from another available one.
Finalize
So far, we’ve learned about Wi-Fi and DHCP. Let’s recap. Let’s say you’re in a cafe and you want to connect to Wi-Fi to view Instagram,
- Scan: Your smartphone detects the “Cafe_WiFi” signal.
- tap “Cafe_WiFi” and enter your password. The cafe router verifies that the password is correct.
- Association: The router will add your smartphone to its management list. You can now send and receive data to and from the router.
- Start DHCP (DORA):**
- Discover (D):** The smartphone sends a Discover request that is broadcast throughout the network.
- The routers (DHCP servers) hear the message and respond.
- R (Request): The smartphone accepts the offer and broadcasts it again so that other servers know.
- A (ACK): The router finally acknowledges and finalizes the IP assignment.
- Internet Communication Starts: Your smartphone now has a unique address and can send and receive data to and from the Instagram servers through the router.
Behind the scenes of my casual Wi-Fi connection, all these different levels of promises were working organically in a very short time. I hope this article has helped you understand how Wi-Fi and DHCP work.
*Please note that this is a personal study and compilation, so there may be inaccuracies and gaps. Please leave a comment!