
... views
Deploying a WebDAV server for Zotero synchronization with Coolify
Our experience building a WebDAV server on Coolify and implementing document synchronization across devices.
Intro
I've been using Zotero for a long time as a bibliographic management program. I love the highlighting, note-taking, and capture features, as well as the integration with Obsidian via a plugin, and I've noticed that the UI has gotten a lot prettier with the Zotero7 update. If you're interested, I recommend checking out this YouTube channel as it's very helpful.
 So, while I was using Zotero. I had a problem. Recently, I had some English studying to do, so I downloaded a pdf of a word sheet and was managing it in Zotero as usual, but I wanted to view it on the go on my iPad. Of course, I could use other apps (good notes, files, etc....), but I wanted to use the highlighting, notes, and features, and I wanted to manage it all in one place. In other words, I wanted to see what I was doing on my iPad on my MacBook, phone, etc. Zotero provides this functionality. You can use their Zotero Storage service, which is a little bit expensive. And there's a space limit.
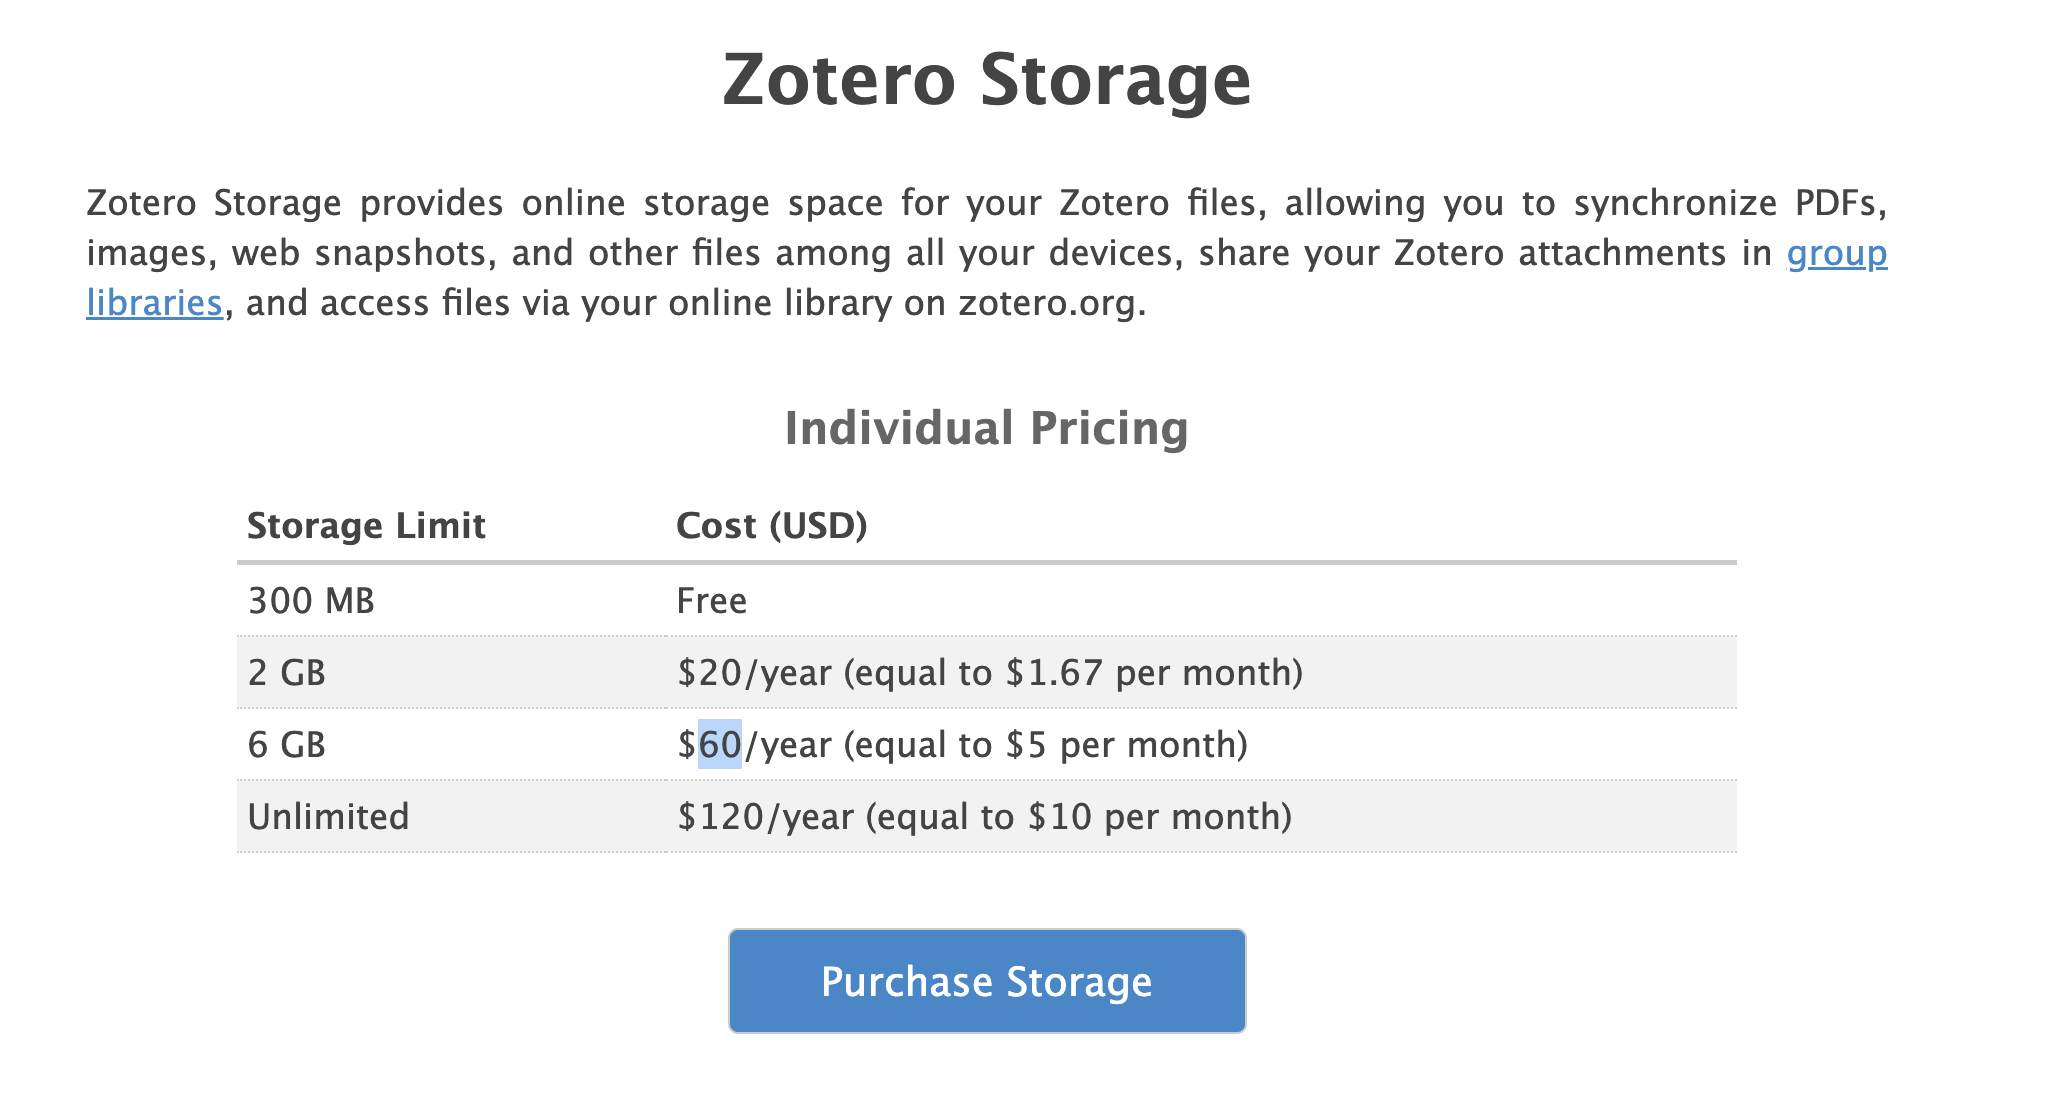
So I was looking at the Zotero sync documentation to find another alternative and came across the topic File Sync using WebDAV. It said that as long as you have a server that supports the WebDAV protocol, you can use zotero sync. I thought, this is it! But first, I needed to know what WebDAV is.
WebDAV
Web Distributed Authoring and Versioning (WebDAV) is a standard technology that extends the HTTP protocol to enable collaborative editing and management of files stored on a web server.
Here's what's notable about it
- it is an extension of the HTTP protocol.
- allows remote file collaborative editing and management remote file collaboration editing and management.
Protocol extending the HTTP protocol
- Leverages existing HTTP methods: WebDAV leverages the existing methods of HTTP, including GET, POST, PUT, and DELETE, while adding new methods for file management and collaboration.
- PROPFIND: Lookup metadata for files and directories.
- PROPPATCH: Modify file properties
- MKCOL**: Create a directory
- COPY**: Copy a file
- MOVE: Move files
- LOCK/UNLOCK: Lock and unlock files
- VERSION-CONTROL: Version control
- XML-based data exchange: WebDAV uses XML to exchange file metadata. This allows for efficient management of file attributes, lock status, version information, and more.
Remote file collaboration editing and management
- File locking (LOCK/UNLOCK)**: You can lock files to prevent them from being overwritten in a multi-user environment. This is an important feature when collaborating, as it prevents conflicts when other users are editing a file.
- Property management (PROPFIND/PROPPATCH)**: You can view and modify a file's metadata (creation date, modification time, author, etc.). This enhances file history management and search capabilities.
- Namespace management (COPY/MOVE): Allows you to copy or move files within the server. This is useful for relocating files while maintaining the file structure.
- Versioning: WebDAV provides the ability to version files. This allows you to track the change history of a document and revert to a previous version.
Learning about WebDAV helped me understand why Zotero uses this protocol for file synchronization. The methods for managing documents are well implemented, and using XML to send and receive only the information we need makes it relatively fast. Now that we've learned about WebDAV, it's time to implement it.
Implementing a WebDAV Server
When I did a Google search for Zotero webdav, I found that most of them use an external service or use a Symantec NAS. I didn't want to use an IaaS external service because of security and privacy concerns, and I didn't have a NAS, so I had to find another way. So, I decided to utilize an existing instance of Oracle Cloud Infrastructure (OCI) to host the WebDAV server. The Zotero documentation said that all you need is a server that honors the WebDAV protocol to file sync, so I figured that would be fine. If you have a spare computer, you can follow along. I found a repository that implemented a simple server that honors the WebDAV protocol.
It was easy to set up with just one conf, and best of all, I had the docker image deployed, so I could simply write the following Dockerfile and use it.
FROM ghcr.io/hacdias/webdav:latest

ENTRYPOINT [ "webdav", "-c", "/webdav/config.yml" ]
The config settings for the deployed server are as follows.
address: 0.0.0.0
port: 6065

# TLS-related settings if you want to enable TLS directly.
tls: false
cert: cert.pem
key: key.pem

# Prefix to apply to the WebDAV path-ing. Default is '/'.
prefix: /

# Enable or disable debug logging. Default is 'false'.
debug: false

# Disable sniffing the files to detect their content type. Default is 'false'.
noSniff: false

# Whether the server runs behind a trusted proxy or not. When this is true,
# the header X-Forwarded-For will be used for logging the remote addresses
# of logging attempts (if available).
behindProxy: false

# The directory that will be able to be accessed by the users when connecting.
# This directory will be used by users unless they have their own 'directory' defined.
# Default is '.' (current directory).
directory: /data

# The default permissions for users. This is a case insensitive option. Possible
# permissions: C (Create), R (Read), U (Update), D (Delete). You can combine multiple
# permissions. For example, to allow to read and create, set "RC". Default is "R".
permissions: CRUD // [!code highlight]

# The default permissions rules for users. Default is none. Rules are applied
# from last to first, that is, the first rule that matches the request, starting
# from the end, will be applied to the request.
rules: []

# The behavior of redefining the rules for users. It can be:
# - overwrite: when a user has rules defined, these will overwrite any global
# rules already defined. That is, the global rules are not applicable to the
# user.
# - append: when a user has rules defined, these will be appended to the global
# rules already defined. That is, for this user, their own specific rules will
# be checked first, and then the global rules.
# Default is 'overwrite'.
rulesBehavior: overwrite

# Logging configuration
log:
  # Logging format ('console', 'json'). Default is 'console'.
  format: console
  # Enable or disable colors. Default is 'true'. Only applied if format is 'console'.
  colors: true
  # Logging outputs. You can have more than one output. Default is only 'stderr'.
  outputs:
  - stderr

# CORS configuration
cors:
  # Whether or not CORS configuration should be applied. Default is 'false'.
  enabled: true
  credentials: true
  allowed_headers:
    - Depth
  allowed_hosts:
    - http://localhost:8080
  allowed_methods:
    - GET
  exposed_headers:
    - Content-Length
    - Content-Range

# The list of users. If the list is empty, then there will be no authentication.
# Otherwise, basic authentication will automatically be configured.
#.
# If you're delegating the authentication to a different service, you can proxy
# the username using basic authentication, and then disable webdav's password
# check using the option:
#.
# noPassword: true
users:
  - username: "{env}ENV_USERNAME" //.
    password: "{env}ENV_PASSWORD"
I've modified the config example in the repository a bit, managing user as an environment variable and setting the default permissions from Read only to full CRUD. The documentation in the repository says that setting up the config file like this and running the command below will spin up the server.
docker run \
 -p 6060:6060 \
 -v $(pwd)/config.yml:/config.yml:ro \
 -v $(pwd)/data:/data \
 ghcr.io/hacdias/webdav -c /config.yml
Looking at the command
- connect the port inside the container to the hostOS with 6060
- use bind mount to mount the config.yml file, where the shell is currently located, inside the container as read only
- mount the data folder with bind mount
- give the running webdav process the
-coption to use the config.yml file mounted in step 2.
By creating the data folder and config.yml file in advance and typing the above commands, we can bring up the server. Now we just need to run it on the remote server.
I'm using the Coolify PaaS for my OCI instance to make deploying and managing the service easier.
Coolify
Coolify is an open source and self-hostable platform that serves as an alternative to Heroku, Netlify, and Vercel. It allows users to deploy resources on their own servers (VPS, Raspberry Pi, EC2, DigitalOcean, Linode, Hetzner, etc.). Any service compatible with Docker can be deployed, and many one-click services are available.
Yes, you can deploy any service that is compatible with Docker. We've covered all the setup for WebDAV Server above, now we just need to apply it to coolify.
The following links will help you with the basic coolify settings and configuration.

Once you have everything set up, create a Project and create an Application. Click New on the Resources tab and you should see the screen like below. 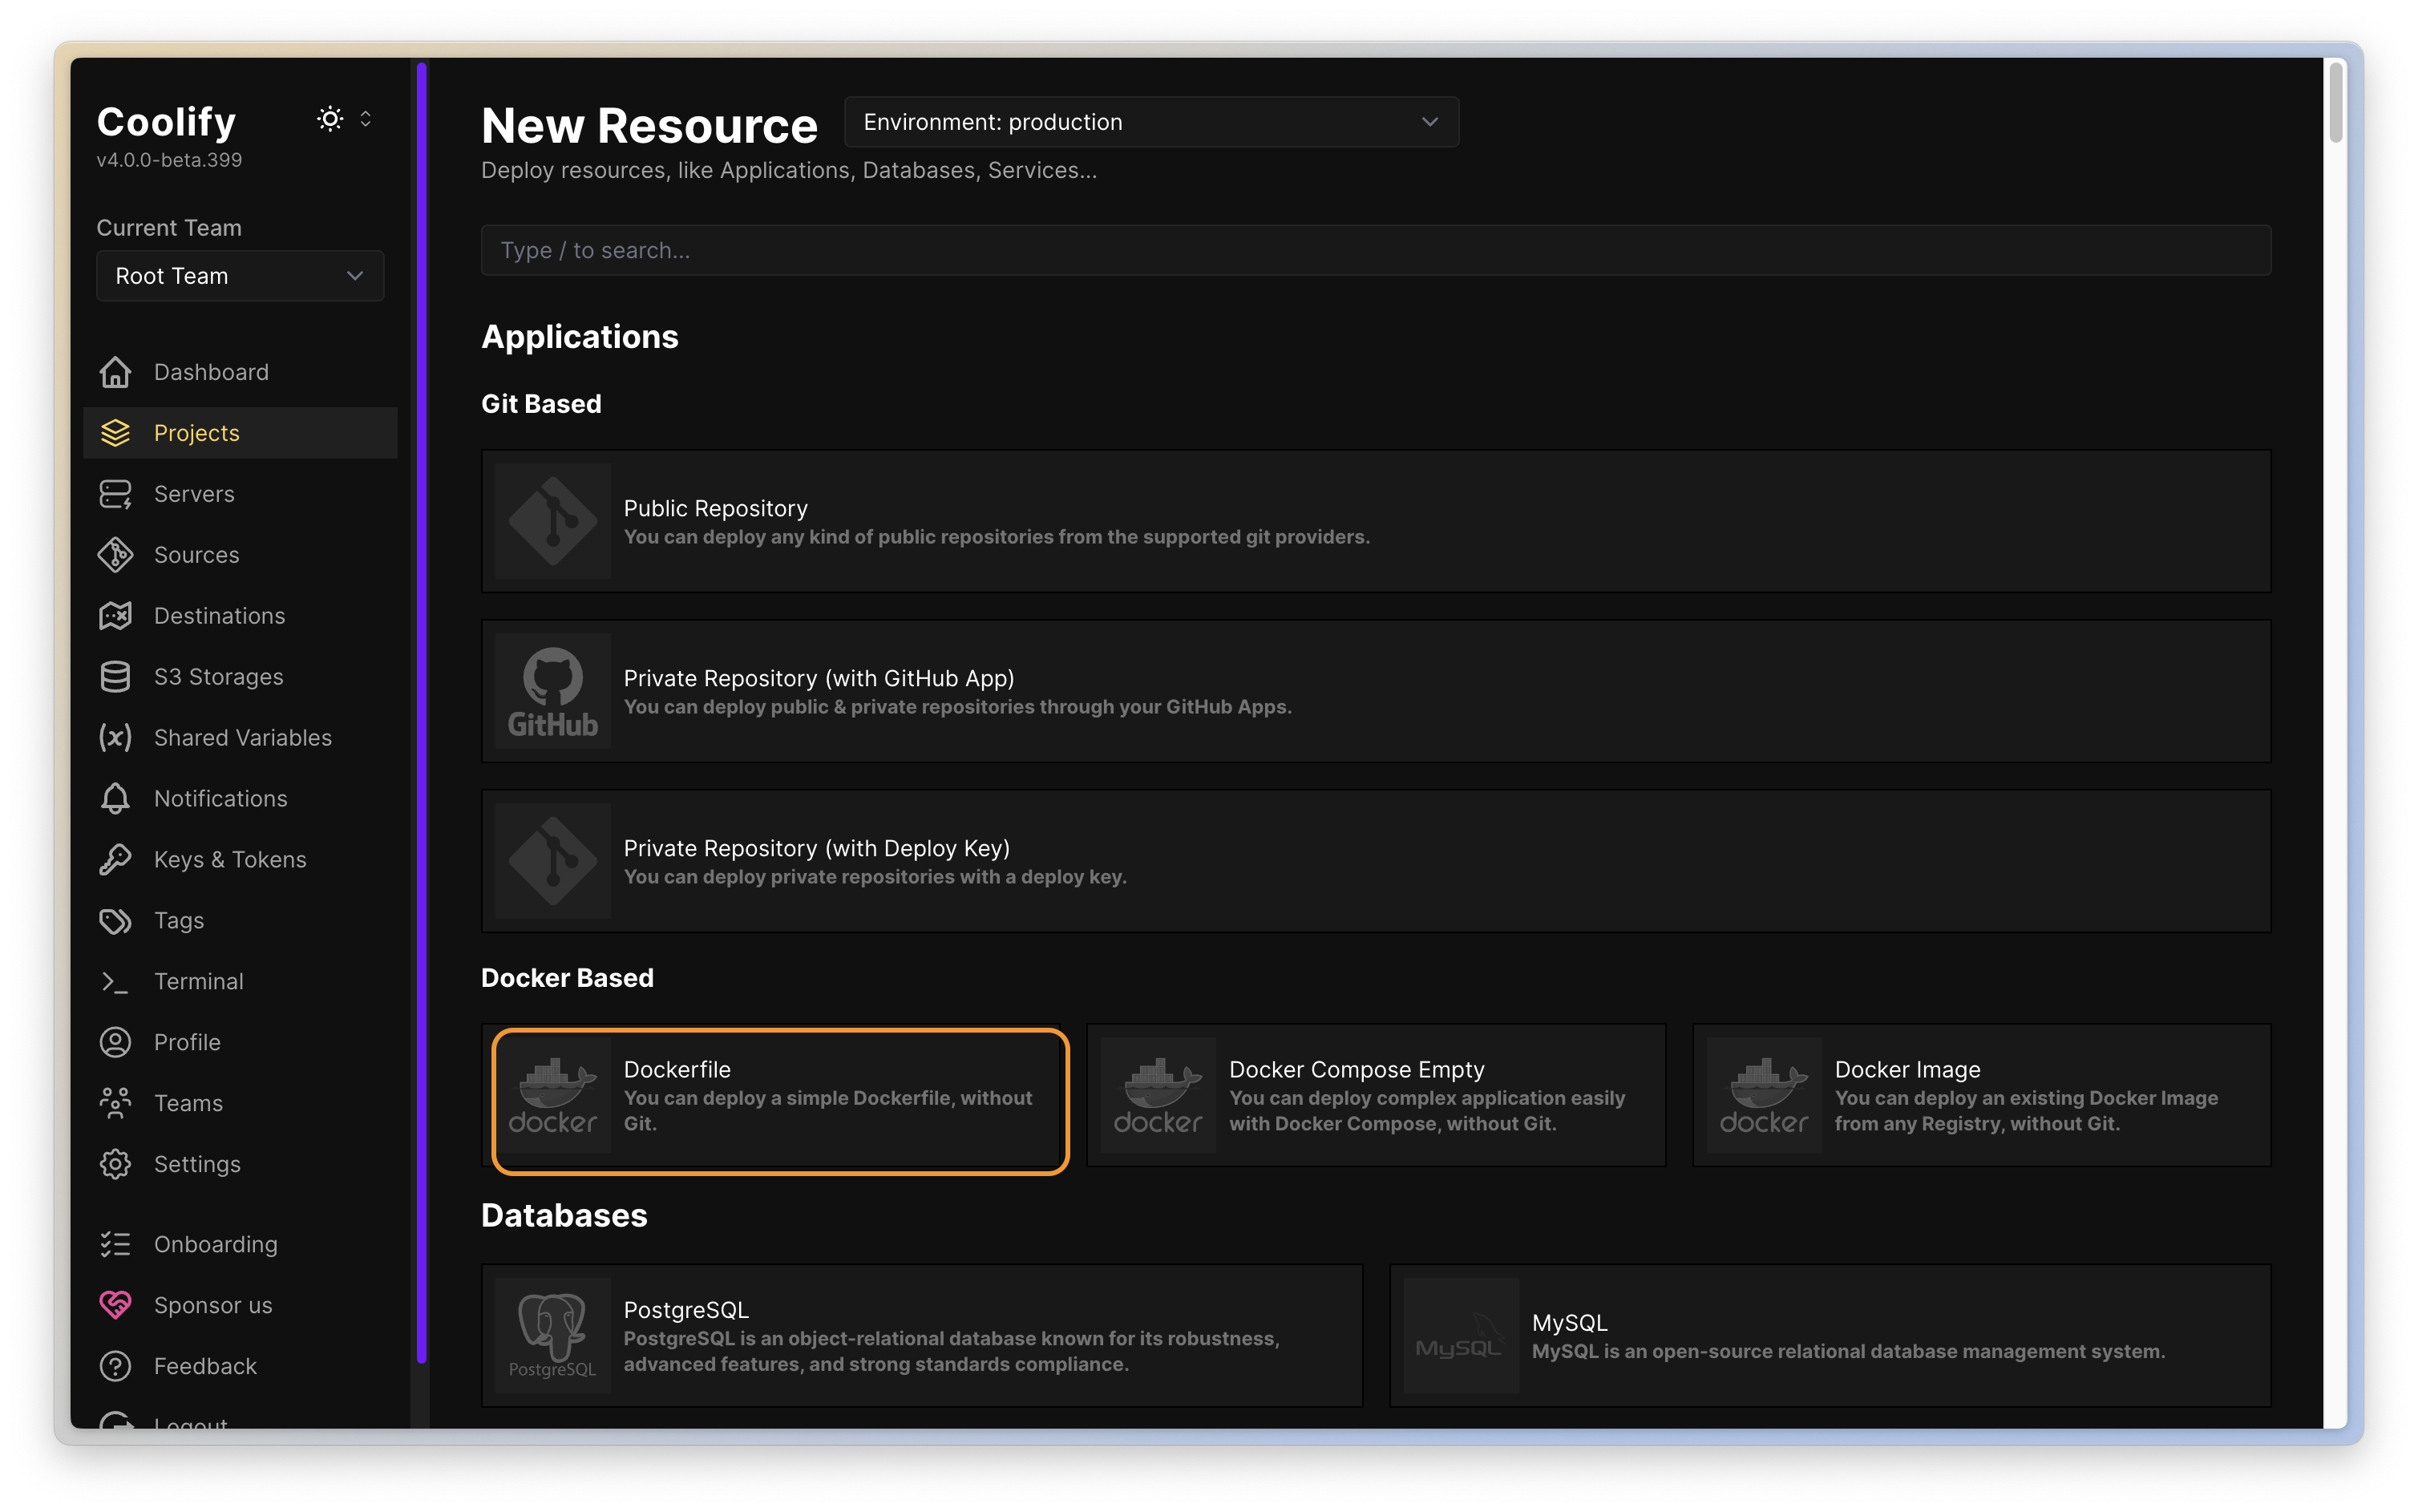 We will simply deploy via Dockerfile, so select Dockerfile from Docker Based. After selecting server, a form will pop up to create a Dockerfile, so we'll put in the Dockerfile we created earlier.
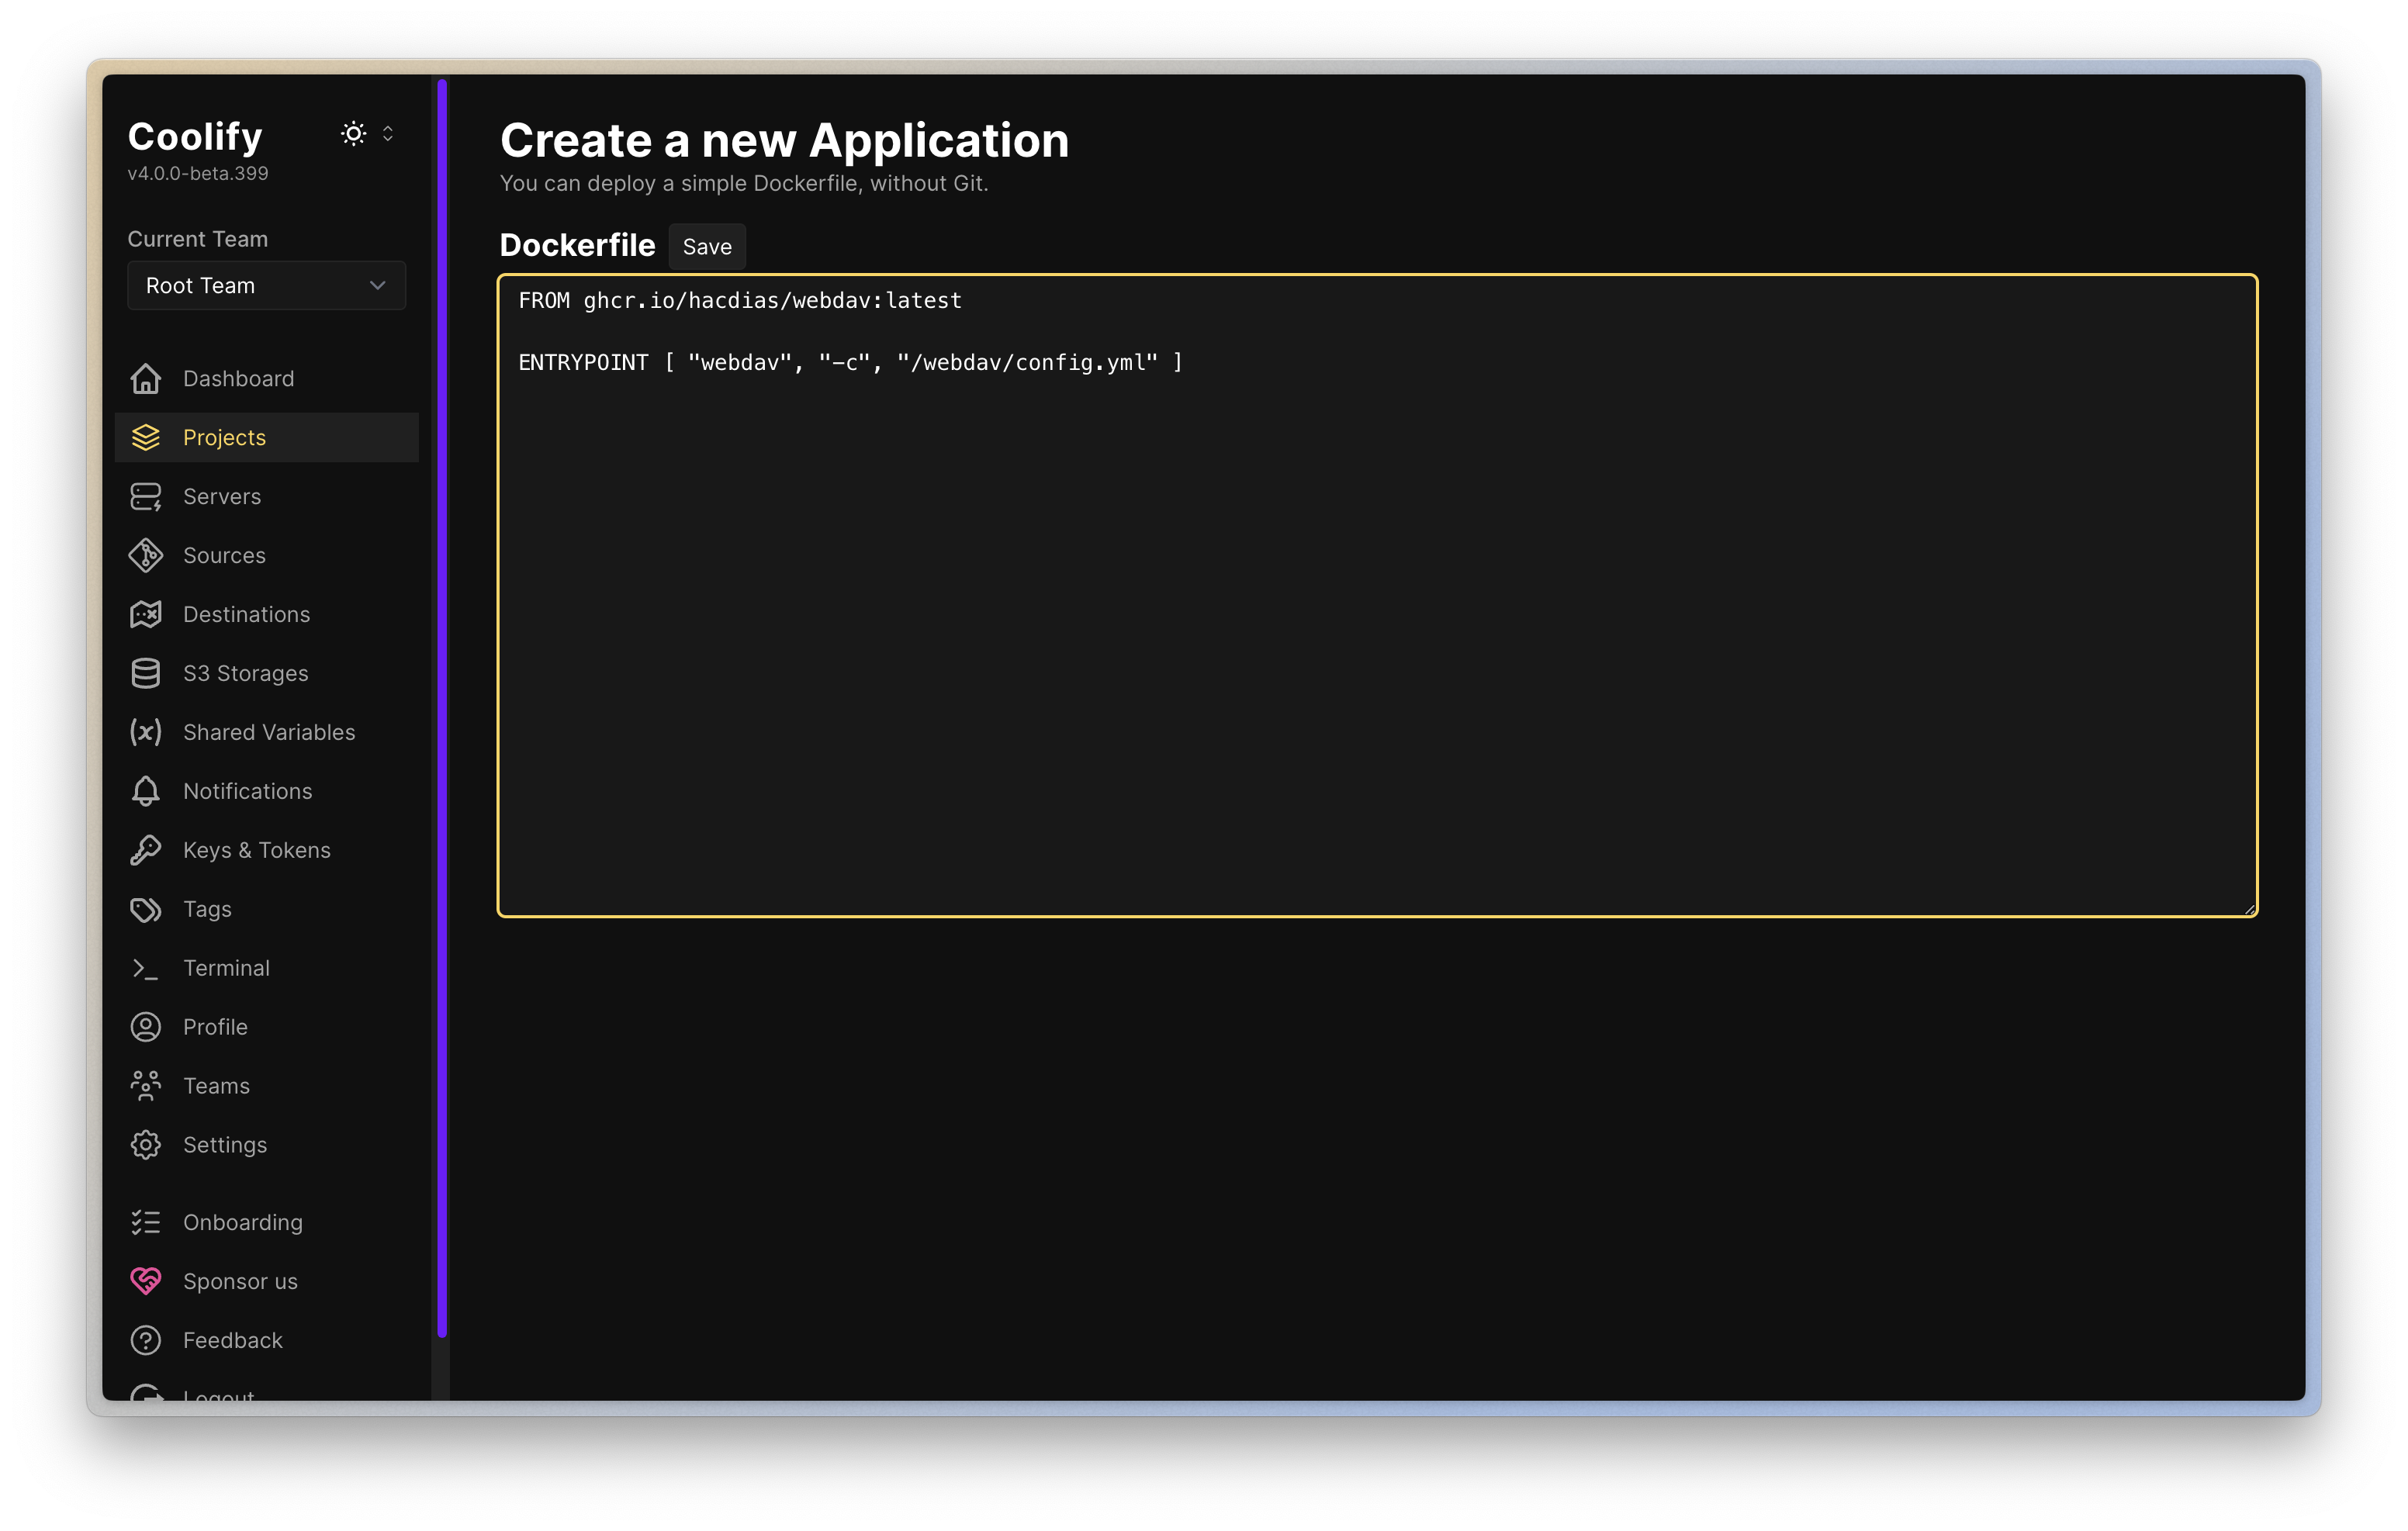
This will take us to the project setup window, and there are two main things we'll set here.
- set bind mount
- set env user
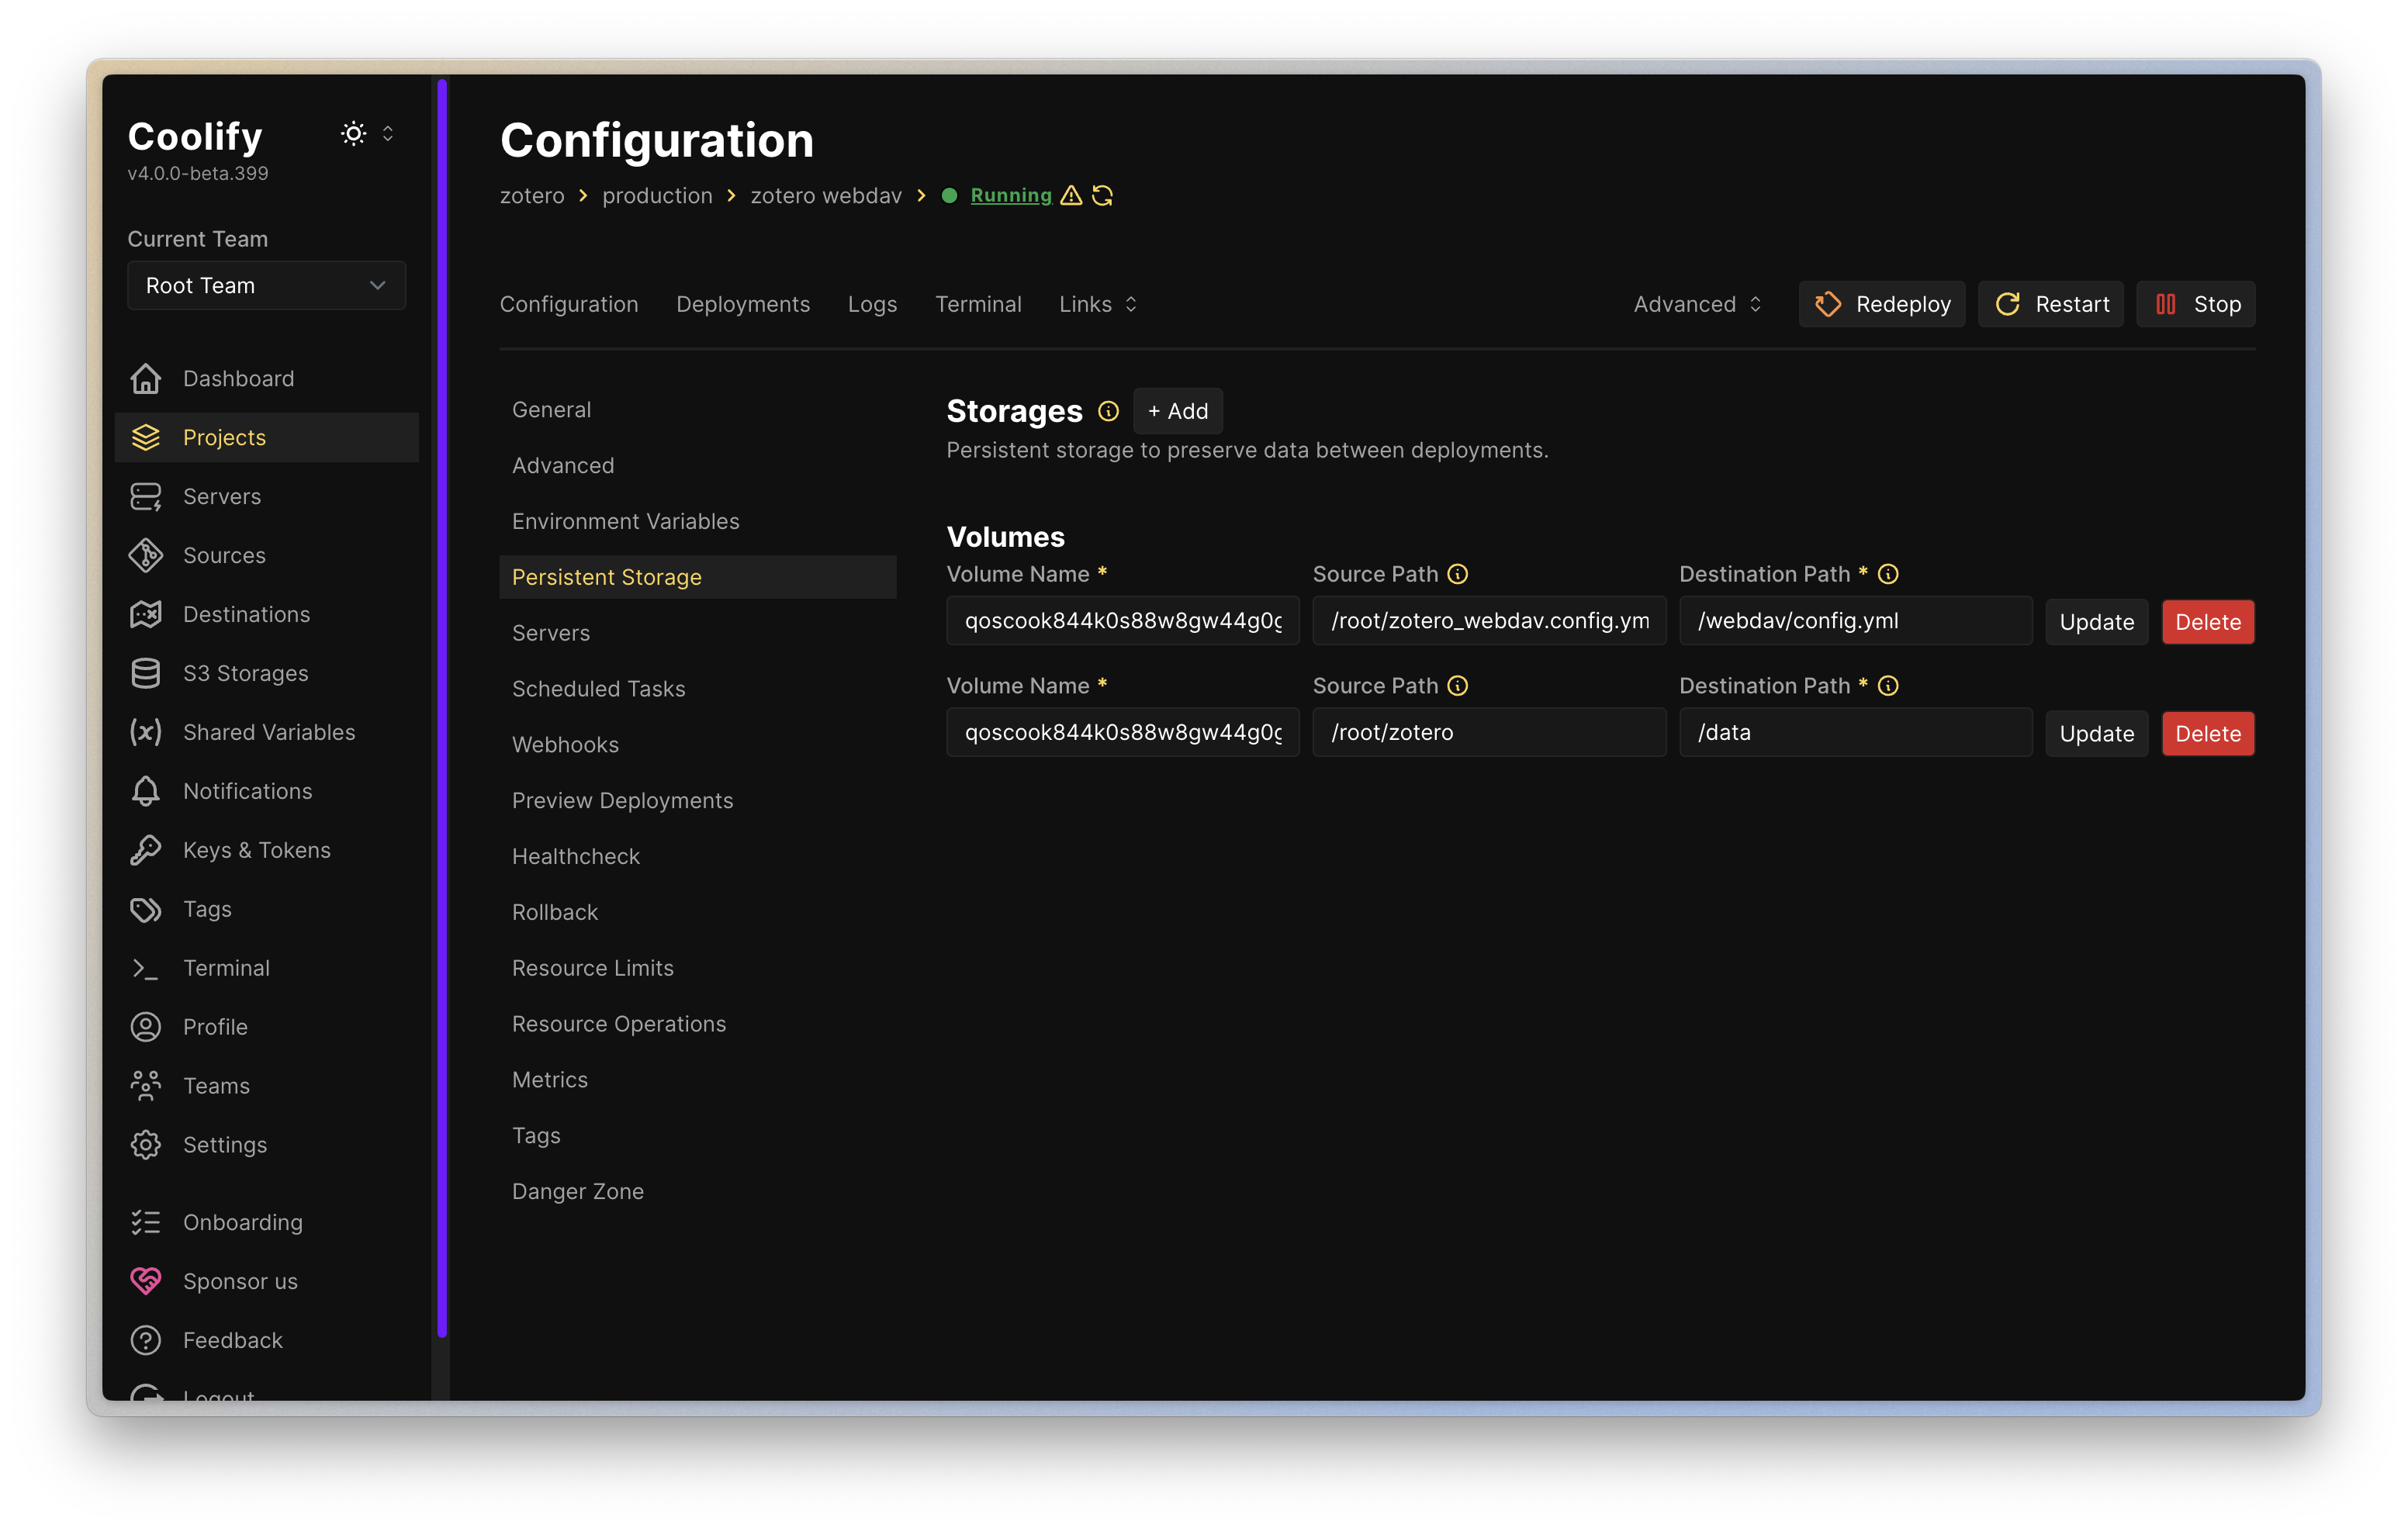
bind mount settings
You can configure bind mount in the Persistent Storage tab.
Click +Add button and you will see the form like below, where we enter the setting in Volume Mount and add it. Source Path is the file path of hostOS and Destination Path is the file path inside Container. 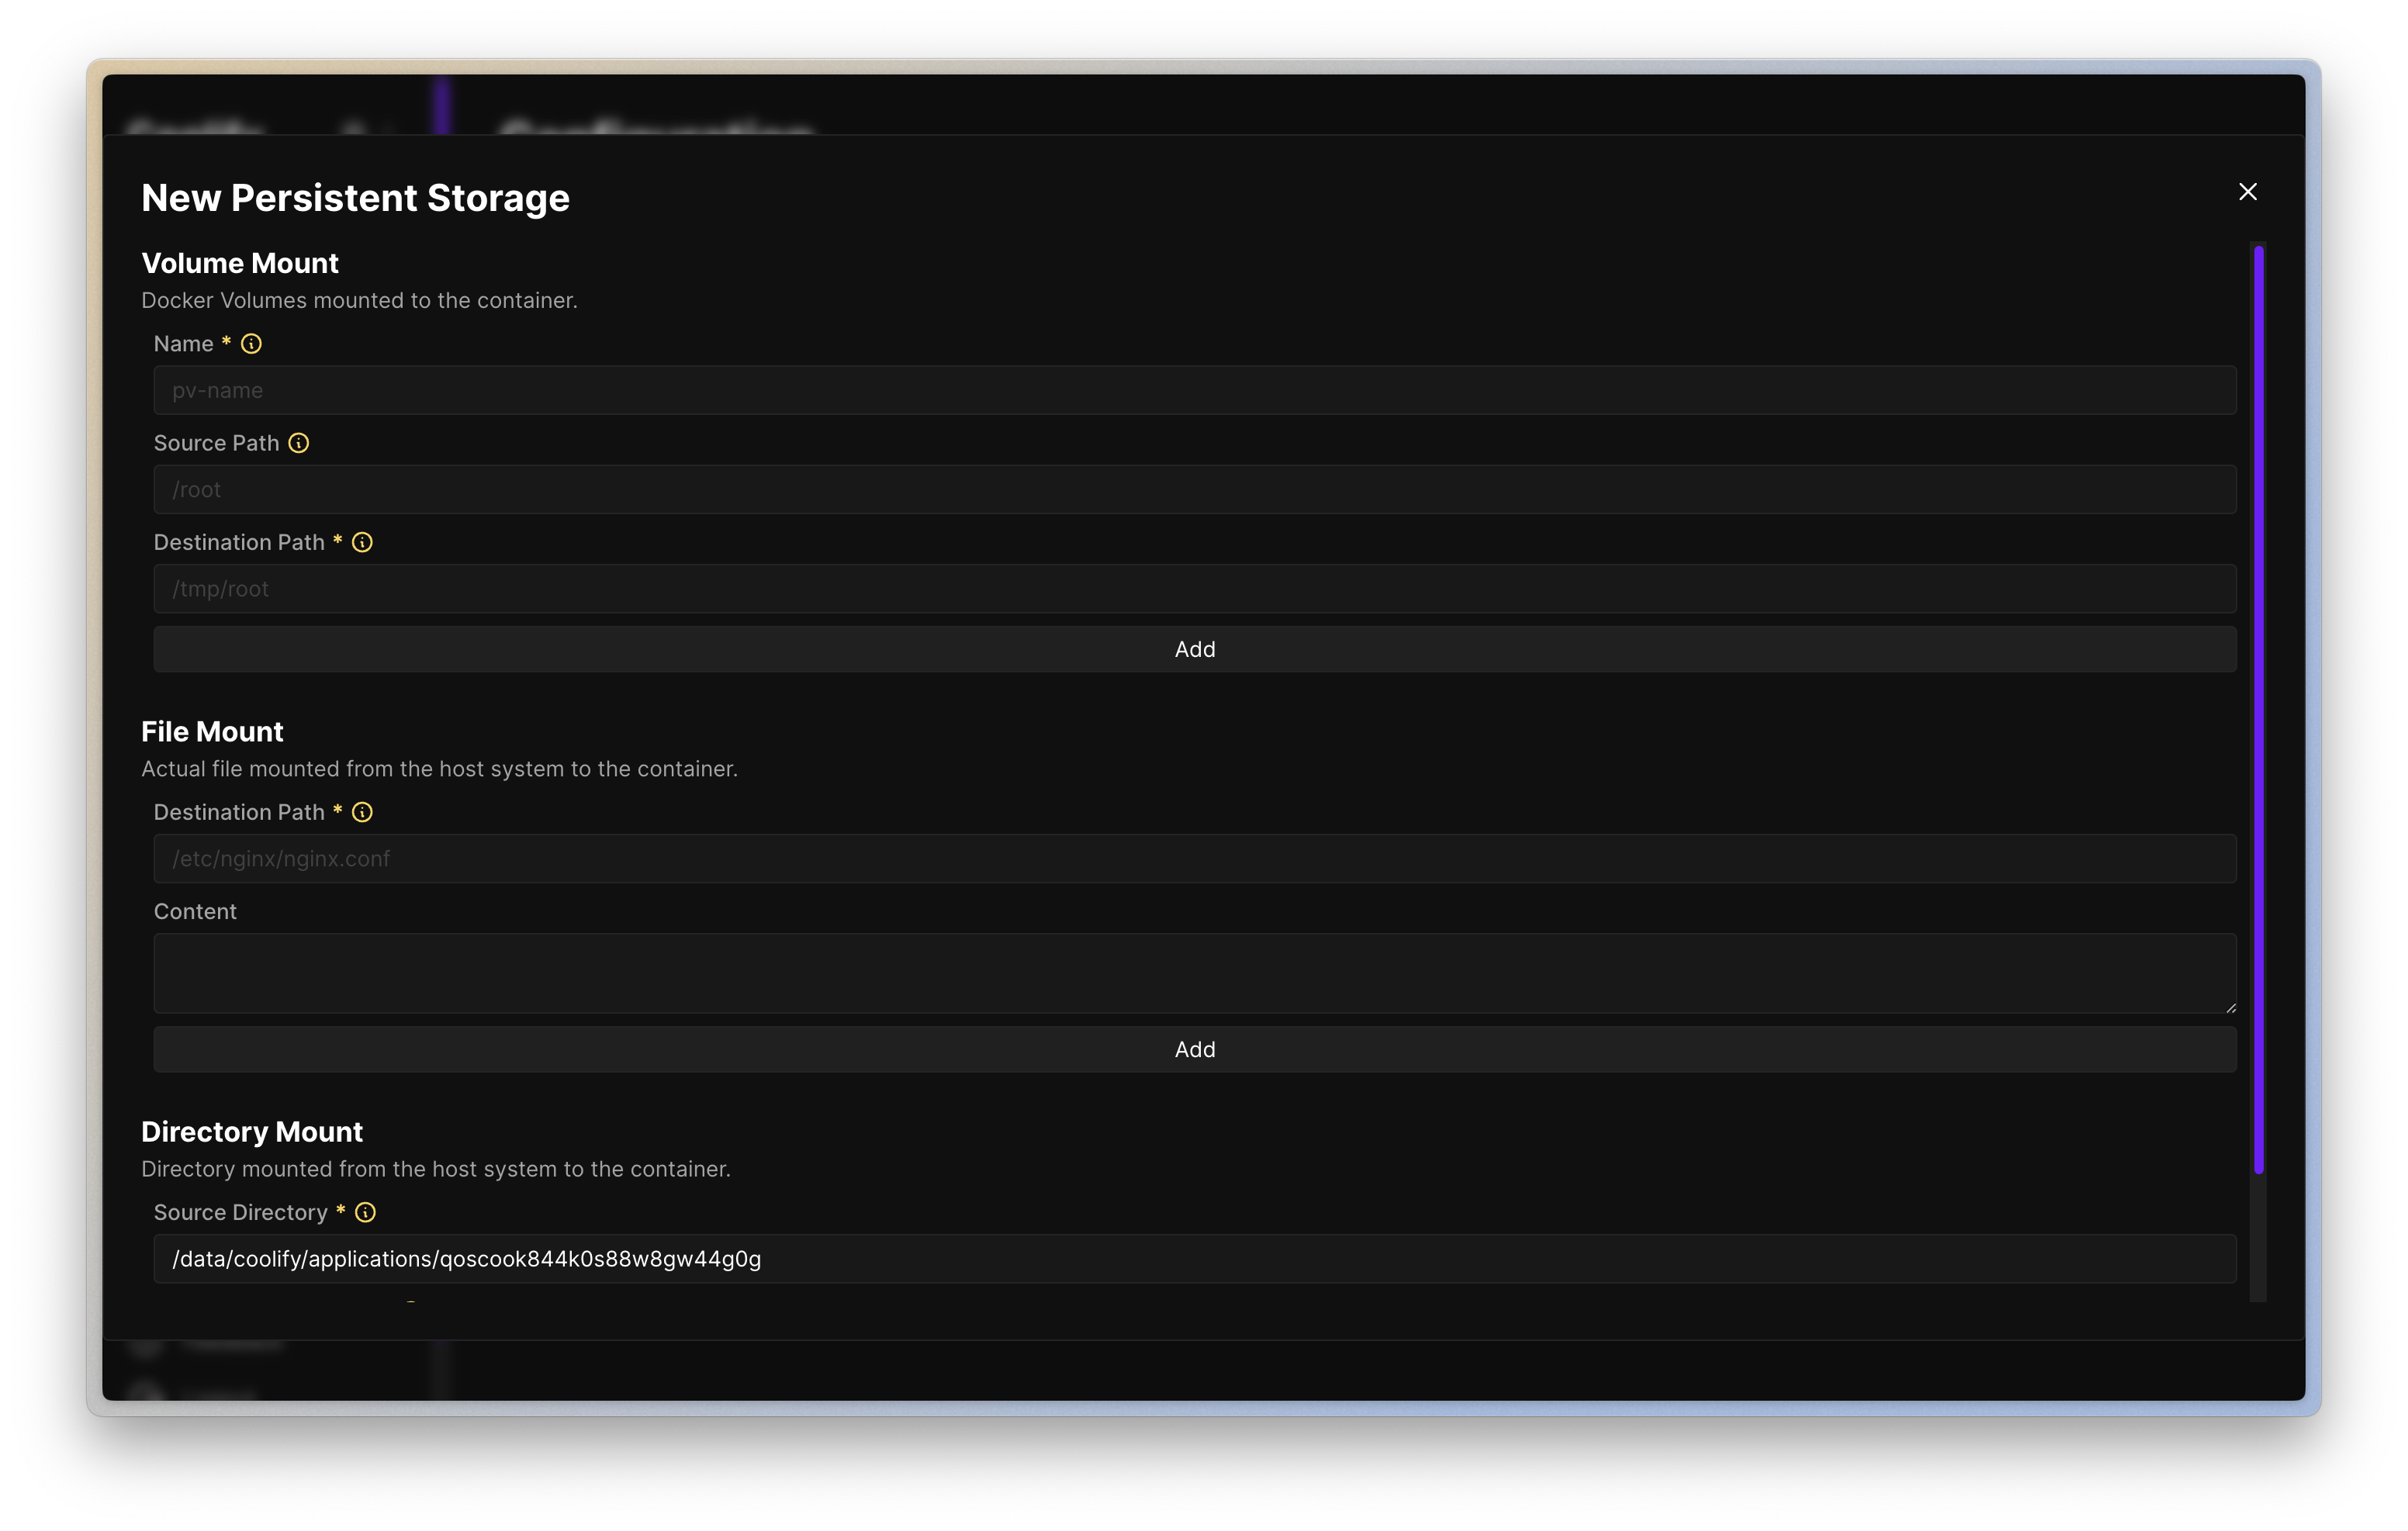 This will bind the first two things we bind mounted (config.yml, data) and it will look like this.
You don't have to use bind mount. You can use anonymous volumes, named volumes, it doesn't matter. Please refer to this link for related configurations
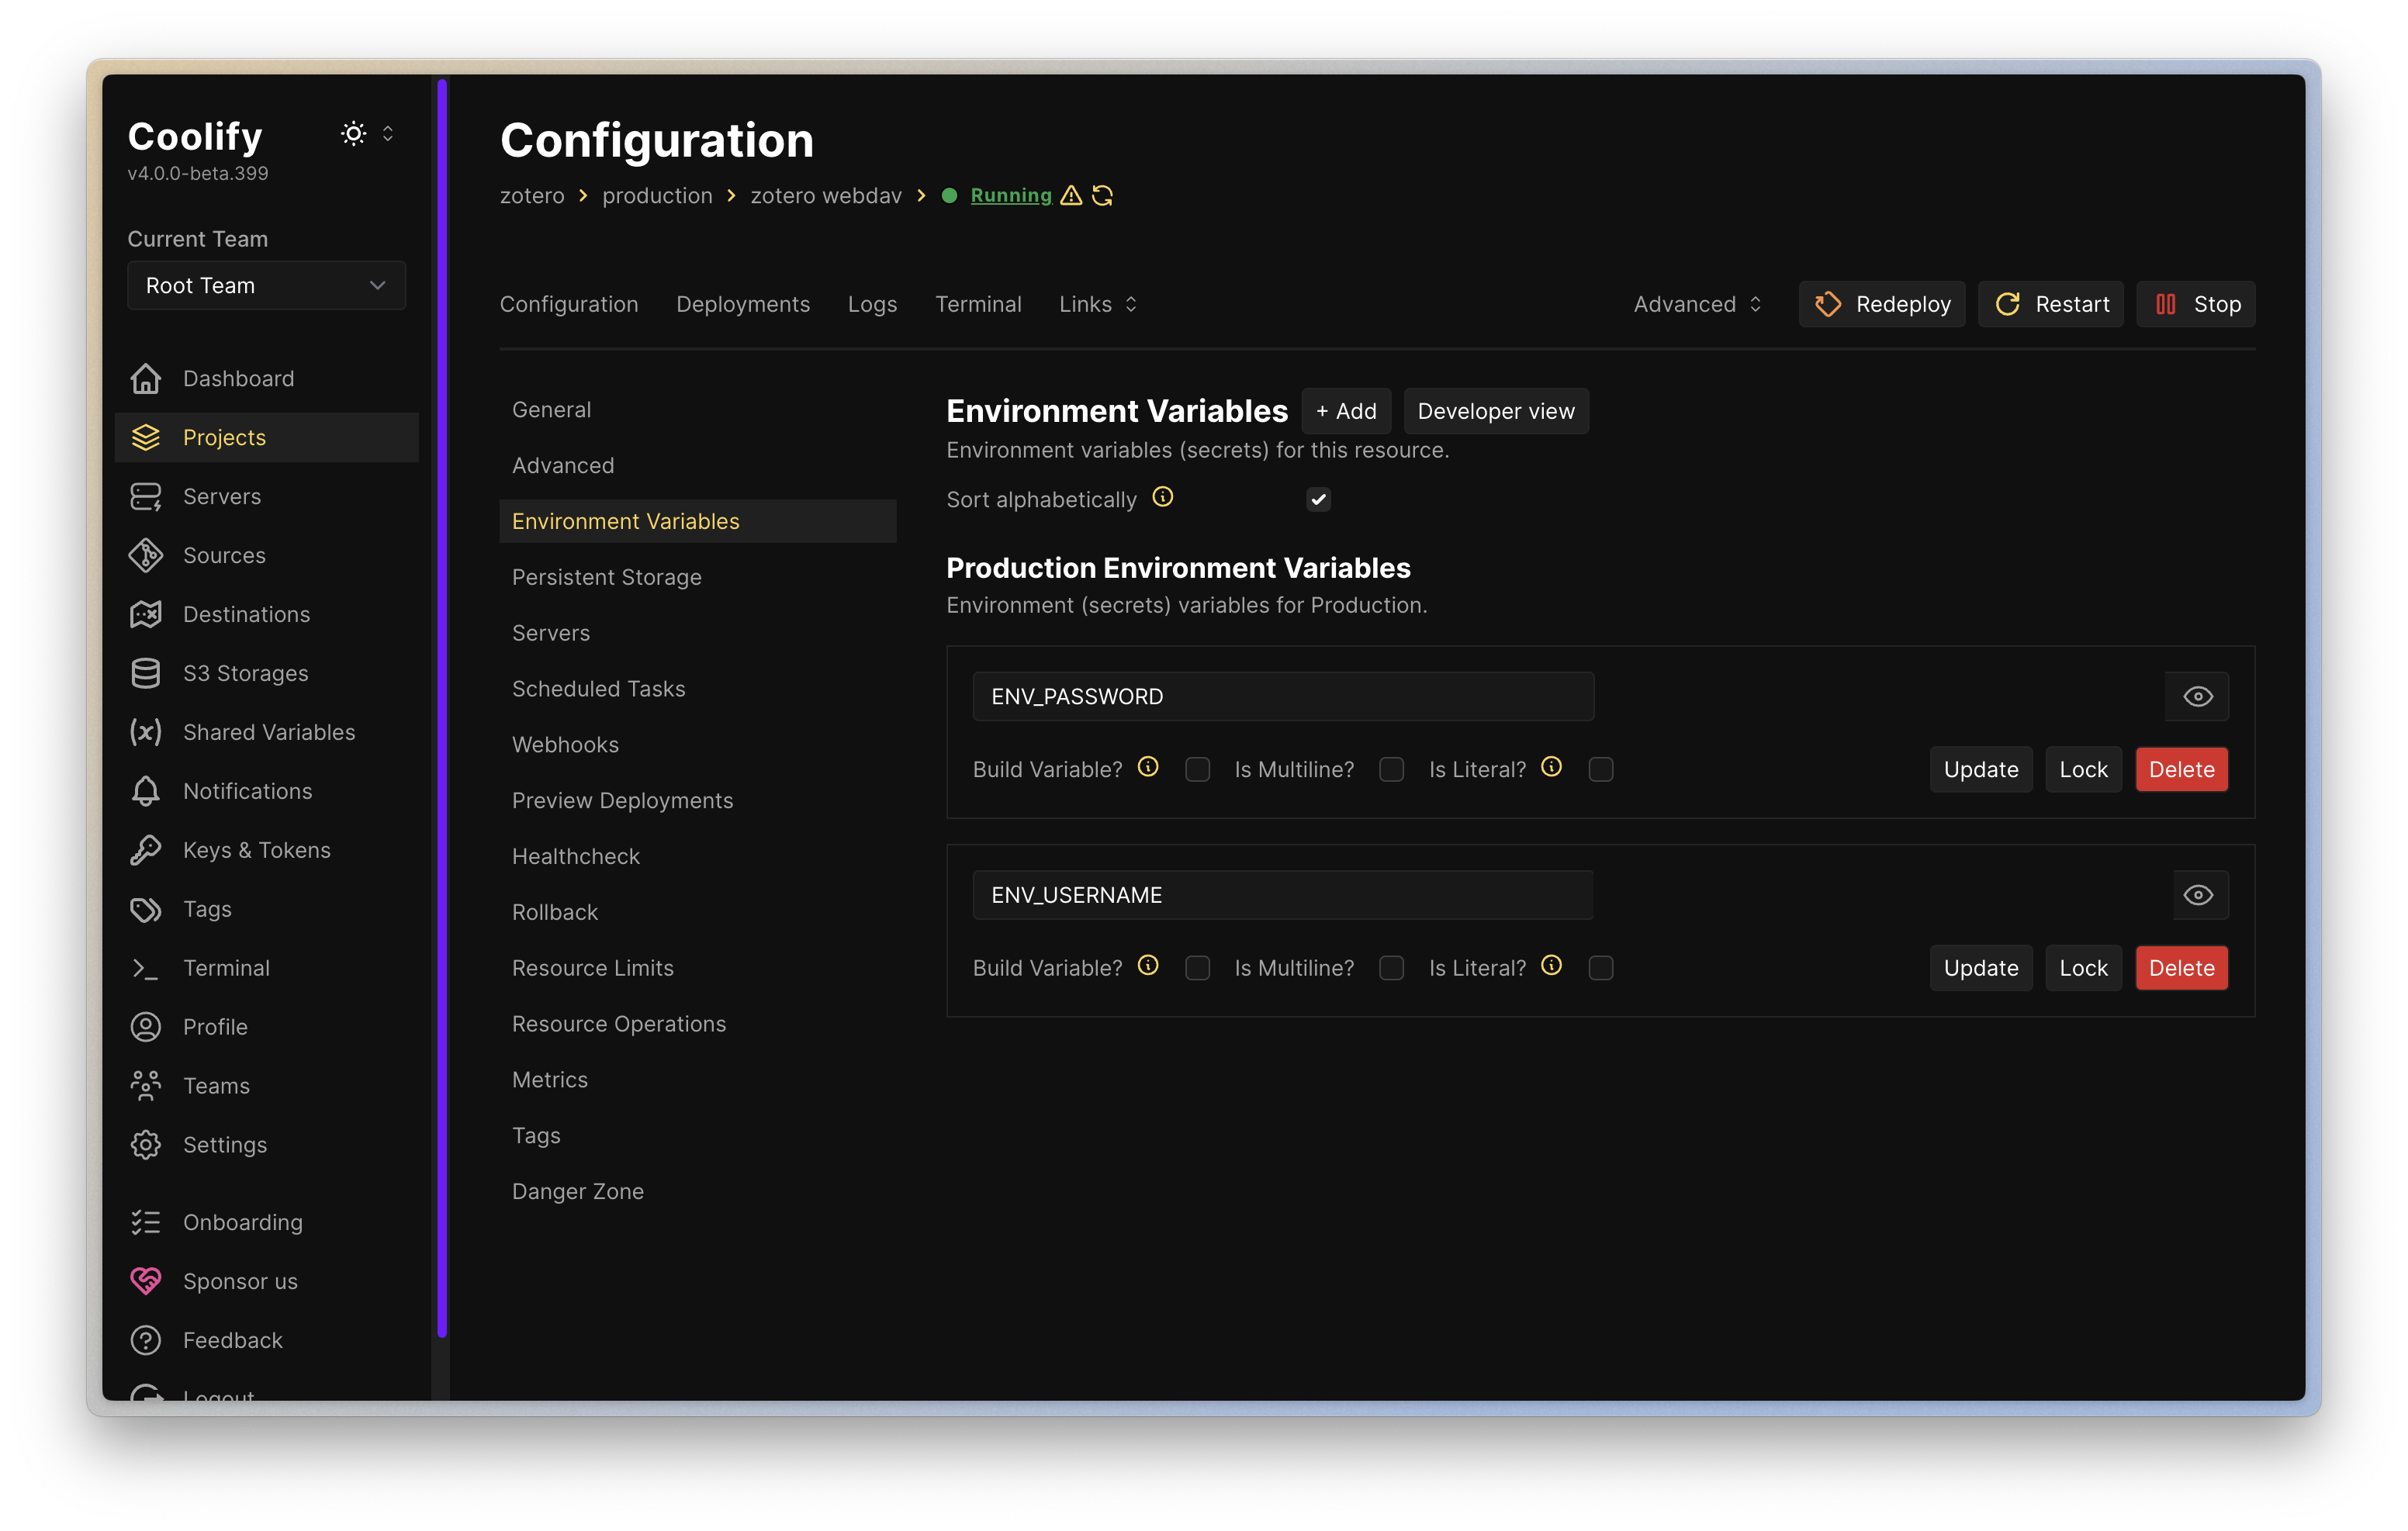
 Here is the user env setting.
Setting env user
On the Environment Variables tab, create a key-value pair with the env name you set in config.yml and add it.
With that set up, we can now hit Deploy and it will deploy. Now all that's left is to file sync with our Zotero application.
Zotero File Sync
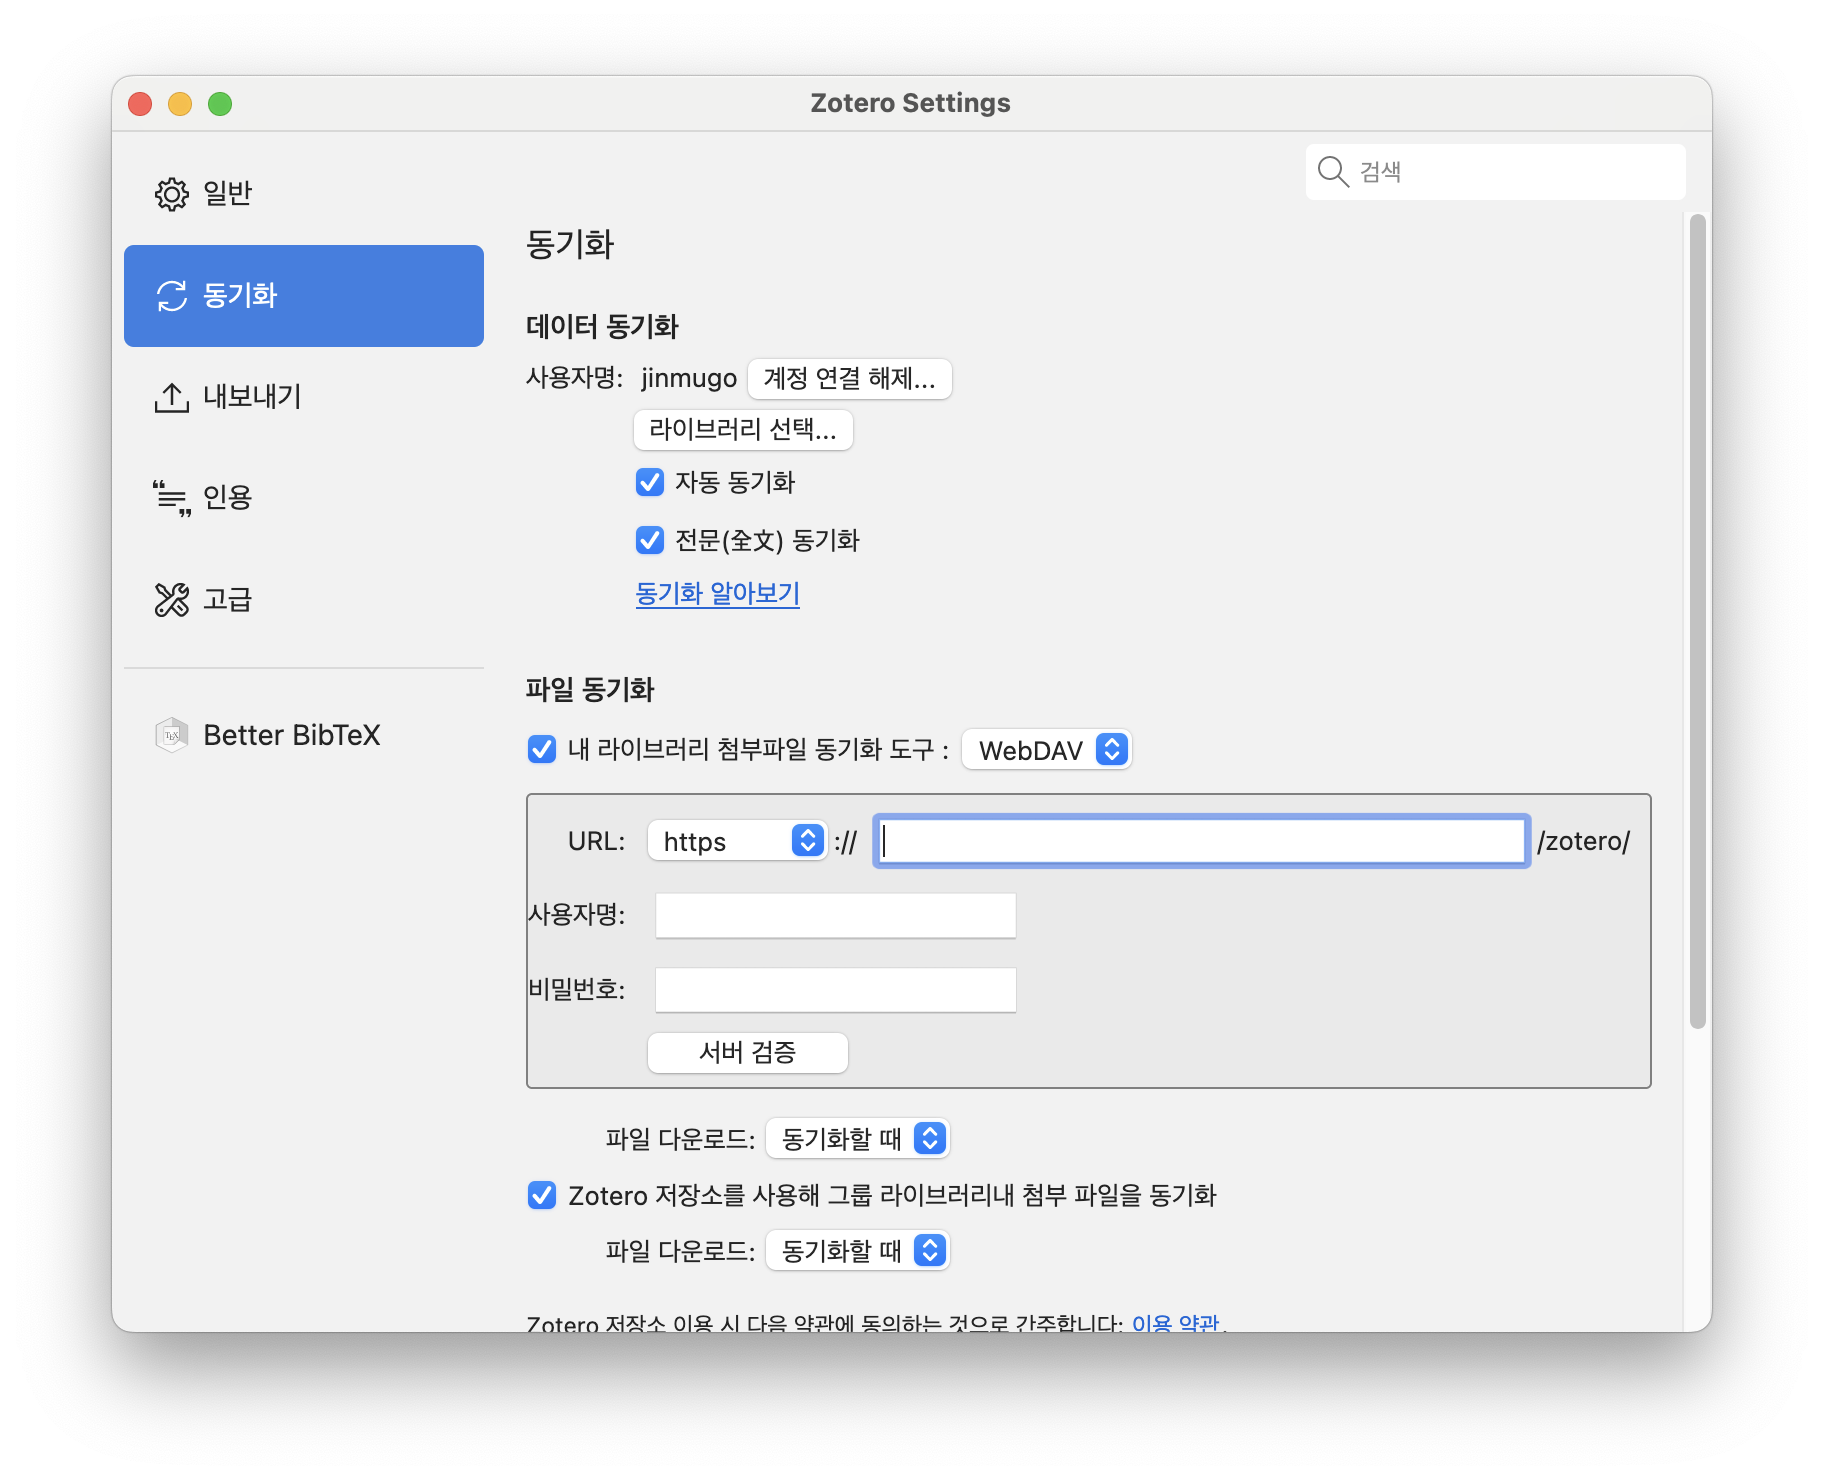
Enter Zotero's settings window and go to the Synchronization tab, where you'll find the File Sync section. Here, replace the sync tool with WebDAV and fill in the form.
- URL: If you set up a domain in coolify, enter the domain that was created. Otherwise, enter the IP of your server and set the port to 6065 as set in config. Here's an example of what you might enter
- example.jinmu.me
- 123.123.123.123.123:6065
- Username: The value of the environment variable
ENV_USERNAME. - Password: The value of the environment variable
ENV_PASSWORD.
With these settings, press the sync button (🔄) on the top right of the zotero application and it will start syncing with the server using the WebDAV protocol. This is how we have our own zoteroo bibliographic management server. Now we can highlight, take notes, capture, etc. on our iPad and synchronize it with any device as long as it has an internet connection.
Outro
We started building the server to memorize words, but it's actually quite fun and it's kinda cool to see it all sync across my iPad, phone, and MacBook :)
I hope this helps anyone reading this, and if you're stuck in the middle of configuring your own server, feel free to ask in the comments or send me an email and I'll try to answer your questions. Thank you.